|
| |
TM 10-4320-311-14
REMOVAL:
a.
Refer to Figure 4-16. Remove front lift handle assemblies (1) and ratchet strap bolt plates (2) from frame (6).
b.
Remove inlet (suction) hose adapter (3) from threaded pipe nipple.
c.
Loosen clamp and disconnect volute drain hose from inside of panel fitting (4).
d.
Remove oil dipstick and unscrew oil filler tube (5) from engine crankcase.
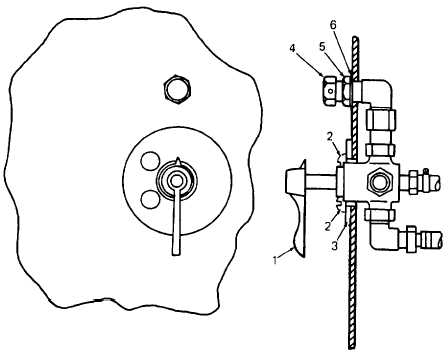
Figure 4-17. Fuel Selection Valve
e.
Refer to Figure 4-17. Remove fuel selection valve handle (1).
f.
Remove two screws (2) securing fuel selection valve and information plate (3).
g.
Remove compression fitting nut (4) from the auxiliary fuel input connection.
h.
Remove retaining nut (5) and washer (6) from auxiliary fuel input connection.
i.
Refer to Figure 4-16. Remove the bolts, washers, and nuts securing the sound enclosure front panel assembly to
the frame (6).
j.
Refer to Figure 4-18. Remove fuel cap (1) and drain plug (2) located at the bottom right corner of the fuel tank
(3) and drain out all fuel into a clean container.
k.
Release hose clamp on injection nozzle (4) side of overflow hose (5), then disconnect overflow hose (5).
I.
Release fuel line hose (6) clamp at fuel selection valve, then disconnect fuel line hose (6) from fuel selection
valve.
m.
Remove two hex head screws (8) securing the upper part of the fuel tank stay bracket (9) and remove stay
bracket.
n.
Refer to Figure 4-16. Pushing fuel selection valve (7) out of the sound enclosure front panel assembly, slide the
front panel outward.
4-36
|