|
| |
TM 10-3835-219-14
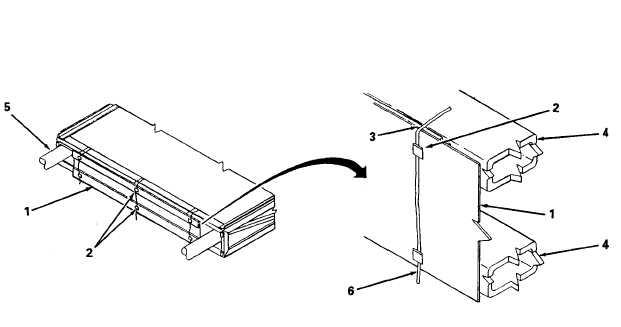
Figure 2-3. Installing Breakaway.
( h )
1
2
3
4
5
6
7
8
9
10
11
Couple hose sections as follows (figure 2-4):
Remove two bolts (1) and nuts (2) securing lower half of pipe coupling clamp (3) and upper half of
pipe coupling clamp (4) to leading end of hose (5) of middle flaking box.
Remove pipe coupling clamp halves (3 and 4) and gasket (6).
Visually inspect coupling to ensure that there are no nicks, dents, or burrs on couplings sealing
faces. If damage or deformity exists, contact unit level maintenance for repair or replacement.
Place gasket (6) over of the hose end. Make certain gasket is flush with end.
N O T E
Align lay-line stripe on hose when coupling hoselines together.
Bring trailing end of top flaking box (swivel end) (7) and leading end of middle flaking box together
and align couplings.
When couplings are in proper alignment, slide gasket (6) over joint and center it in place.
Position lower coupling clamp half (3), then position upper coupling clamp half (4).
Install two bolts (1) so that nuts (2) will be exposed on the upper coupling clamp half.
Hand-tighten nuts evenly, then, using a wrench, tighten nuts evenly until the coupling faces just
m e e t.
Continue tightening nuts evenly until both bolts are secure.
Repeat procedure until hoseline in each flaking box on truck is coupled to the hose in the flaking
box below.
2 - 1 8
|